
How to easily backup your Azure environment using EntraExporter and Azure DevOps Pipeline
EntraExporter + GIT repository + Pipeline + Azure Audit Log = Azure configuration backup solution where even who made the change is back-upped

In the previous article, I focused on making an automated backup of the Intune configuration.
Today I will show you, how to regularly back up your Azure environment configuration using the great EntraExporter PowerShell module and Azure DevOps Pipeline. What makes this so special is that also the authors of the changes are included in the backup.
The result?
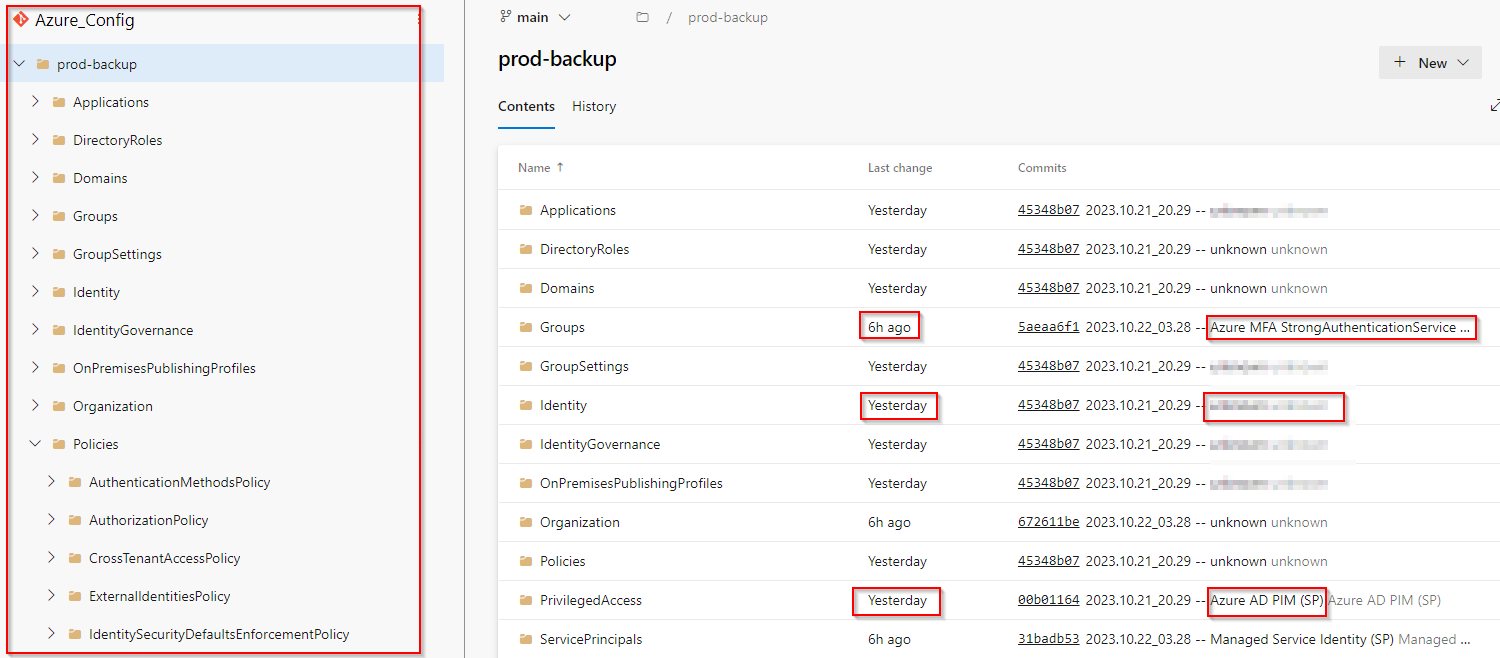
You can easily browse through your Azure environment history saved in your GIT repository and see who made what change and when it happened 🤯
Main benefits of this solution
It is free of charge *
All your Azure configuration will be regularly backed up to your private Azure DevOps GIT repository
Visibility to Azure changes made during the time including the author of such change
Runs in Azure DevOps Pipeline a.k.a. purely code-driven & cloud-driven (no on-premises requirements whatsoever)
* Free DevOps pipeline run is limited to 1800 minutes per month. One full Azure backup run takes approximately 25 minutes (but that depends on the size of your environment) and is run every day, so do the math. But you can always take the pipeline code and run it as a scheduled task on your server without any limitations 😎
Requirements
Azure Global Administrator permissions so you can
create an Azure DevOps project and Workload Federating identity
grant required Graph Api permissions + Directory roles
Let's do this
This solution needs:
Azure DevOps
- a.k.a. GIT repository
Azure DevOps Pipeline
- to run the code that will do all the magic
Workload Federating identity
- a.k.a. Azure Service Principal bind to the Azure DevOps project that will be used to authenticate against Graph Api
Azure DevOps repository
Create a private Azure DevOps repository
Go to https://dev.azure.com/ and create a PRIVATE new repository (project).
Azure_Config in my case.
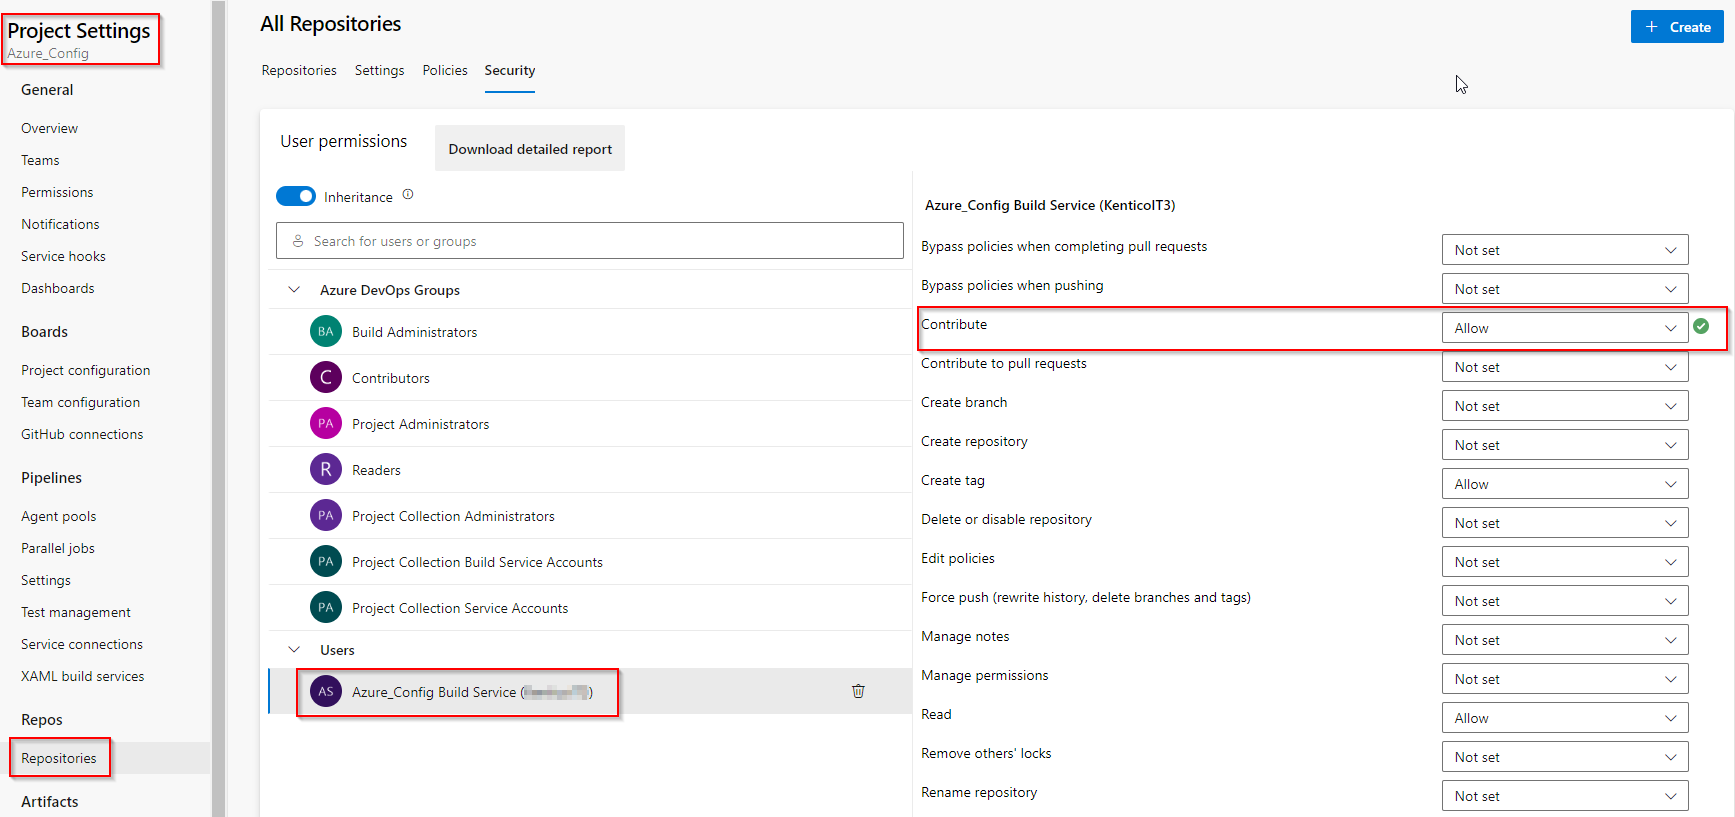
Assign contribute permission
Go to Project settings > Repositories > Security and grant Contribute 'ALLOW' permission to Build Service account. Otherwise, pipeline jobs will fail when a commit is made.
Workload Federating identity
Create Workload Federating identity
Instead of using Azure Service Principal (SP) to authenticate to Graph Api, we will use Workload Federating identity. The main benefit is that you don't have to worry about passing SP secret to your pipeline, renewing it, etc.
How to create a Workload Federating identity is outside of the scope of this article and is described in my other post.
It is just a few steps; the only important thing is to remember what name you used to create Service connection name during the setup, because we will use it in our pipeline later.
In my case, it is azure_backup_connection.
Grant required permissions
Grant the following Graph API application permissions to the created Workload Federating Identity:
-
Policy.Read.All
IdentityProvider.Read.All
Organization.Read.All
User.Read.All
EntitlementManagement.Read.All
UserAuthenticationMethod.Read.All
IdentityUserFlow.Read.All
APIConnectors.Read.All
AccessReview.Read.All
Agreement.Read.All
Policy.Read.PermissionGrant
RoleEligibilitySchedule.Read.Directory
PrivilegedEligibilitySchedule.Read.AzureADGroup
Application.Read.All
OnPremDirectorySynchronization.Read.All
Teamwork.Read.All
TeamworkAppSettings.ReadWrite.All
SharepointTenantSettings.Read.All
Reports.Read.All
RoleManagement.Read.All
Permissions to read the Audit log:
AuditLog.Read.All(required to read Audit log)Directory.Read.All
Grant-AzureServicePrincipalPermission (part of the AzureApplicationStuff module)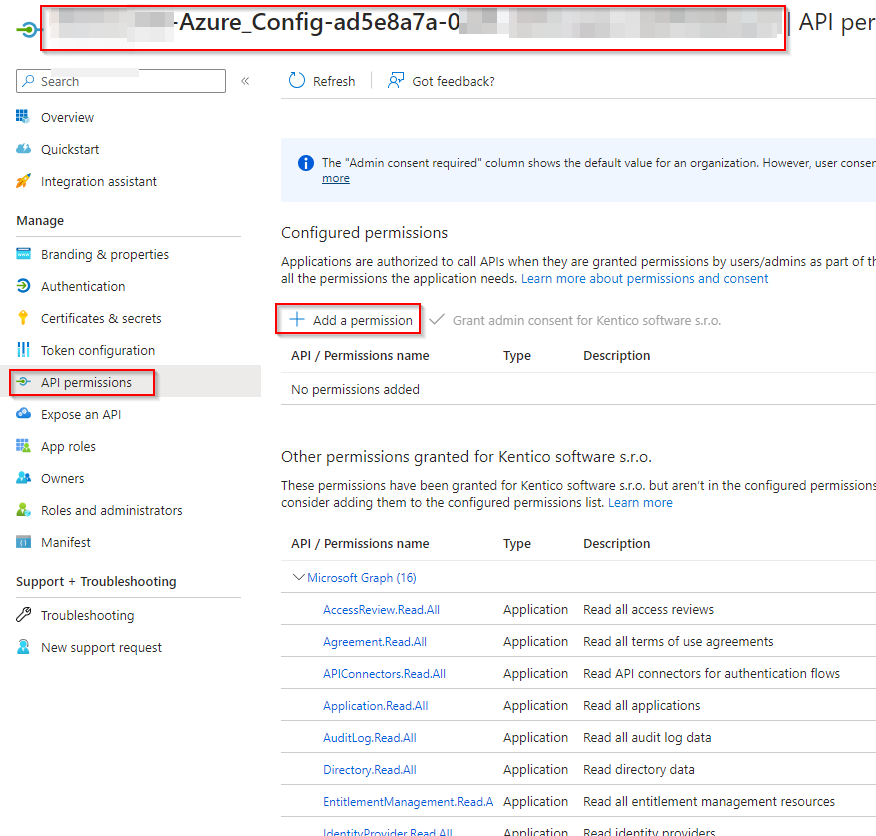
Grant admin consent for all those permissions too!Grant required Directory roles
If PIMResources (or All) export is selected, you need to grant RBAC role Management Group Reader at the Tenant Root Group level (to be able to read Management Groups) to the created Workload Federating Identity
If IAM (or All) export is selected, you need to grant RBAC role Reader at the Tenant Root Group level (to be able to read all subscriptions and their resources) to the created Workload Federating Identity
Azure DevOps repository pipeline
The pipeline is where all the magic happens. It is in fact script that defines what should happen.
Create new Pipeline
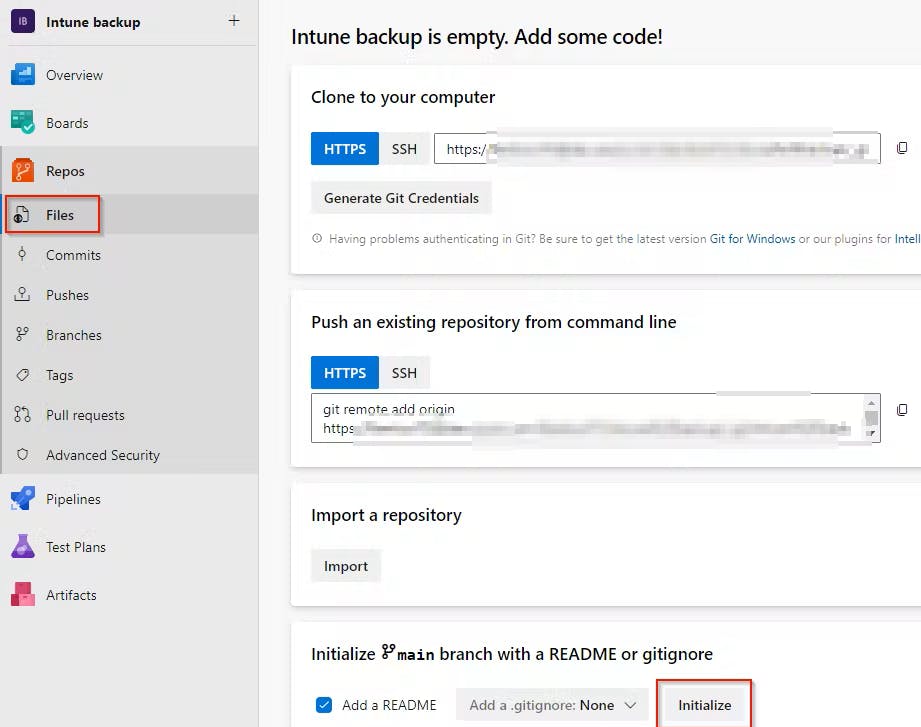
To be able to create a pipeline, your repository needs to be initiated first.
- Go to
Repos>Files> chooseInitialize
- Go to
- Now go to
Pipelinesand create the pipeline usingCreate Pipelinebutton
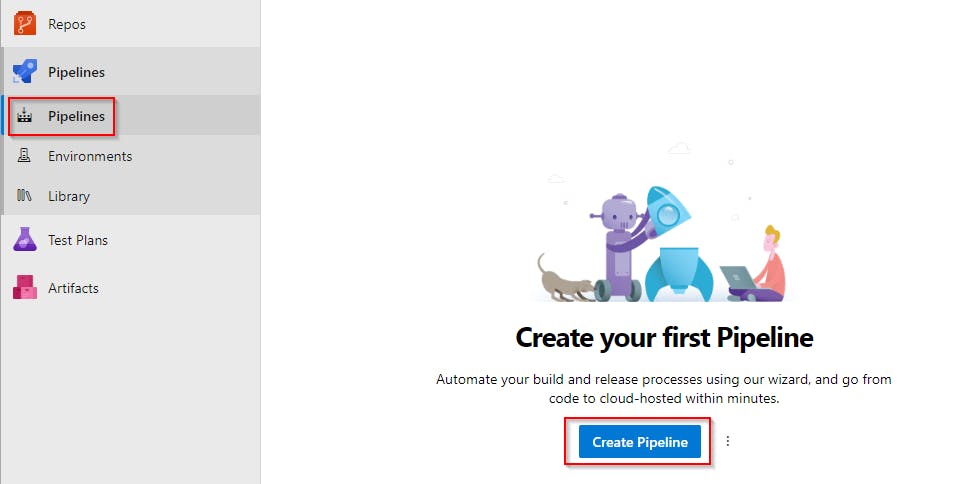
- Select
Azure Repos Git
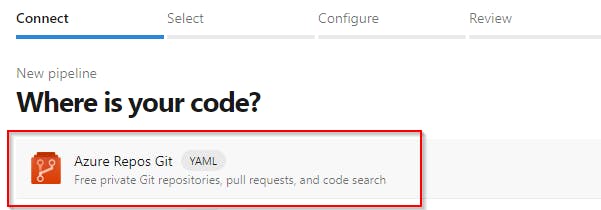
- Select
Starter pipeline

- Copy the content of my azure-backup-pipeline.yml and use it to replace the generated default code!
By default this pipeline will be started every day at 2 am. If you want to change that, just alter the cron key value (
cron: '0 2 * * *'). You can use https://crontab.guru to generate a new one.
Customize predefined pipeline variables
At the beginning of the pipeline code, there are some variables defined that need to be set to match your environment.

SERVICE_CONNECTION_NAME- name of the workload identity service connection (
Service connection name) created earlier
- name of the workload identity service connection (
USER_EMAILyou can leave it as it is
default email that will be used as commits author email, something like Azure_Backupper@contoso.com (or whatever you wish)
USER_NAMEyou can leave it as it is
default username that will be used as commits author, something like Azure_Backupper (or whatever you wish)
Save & Run the pipeline
Now when the pipeline is ready, save it by choosing Save and run . This way you will immediately see whether the pipeline is working fine 👍

Beware that first run will take a lot longer then subsequent runs! The reason is huge amount of files that needs to be backed up. Following runs only captures changes since the last backup.
After the pipeline finishes, you should see that prod-backup folder was created and filled with your Azure configuration JSON files, including who made them 😍
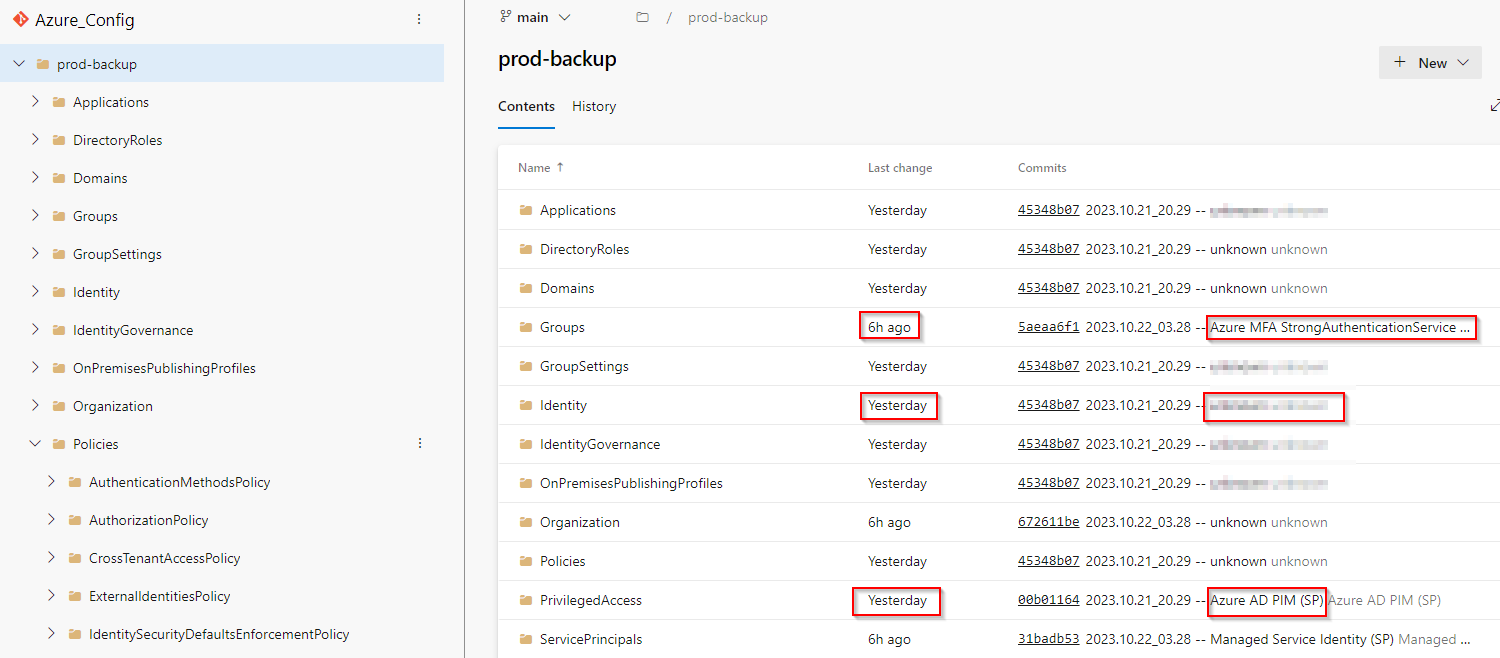
According to the schedule, it will be automatically started by default every day at 2 a.m.
What does this pipeline do?
Install EntraExporter module
Export Azure configuration backup to
prod-backupfolderIf a change in configuration is detected
For each changed file find who did it
- by searching the Azure Audit log for particular ResourceId changes since the last config commit date
Group changed files by the author(s) who changed them
Commit each group separately by using the author name(s)
Create Git TAG
- name of all changes authors will be included in the TAG description
If there is no change
- Pipeline ends
How to
Send a notification in case the pipeline fails
It is useful to be notified when the pipeline fails. For example because application secret expired etc. To do so go to Project settings > Notifications > New Subscription and select Build > A Build fails end finish the wizard.

Get changes made between specified dates
To get a visual list of changes made in your Azure configuration between specified dates, go to Repos > Tags select the first Tag and Set as compare tag, then select the second one and run the comparison by Compare tags
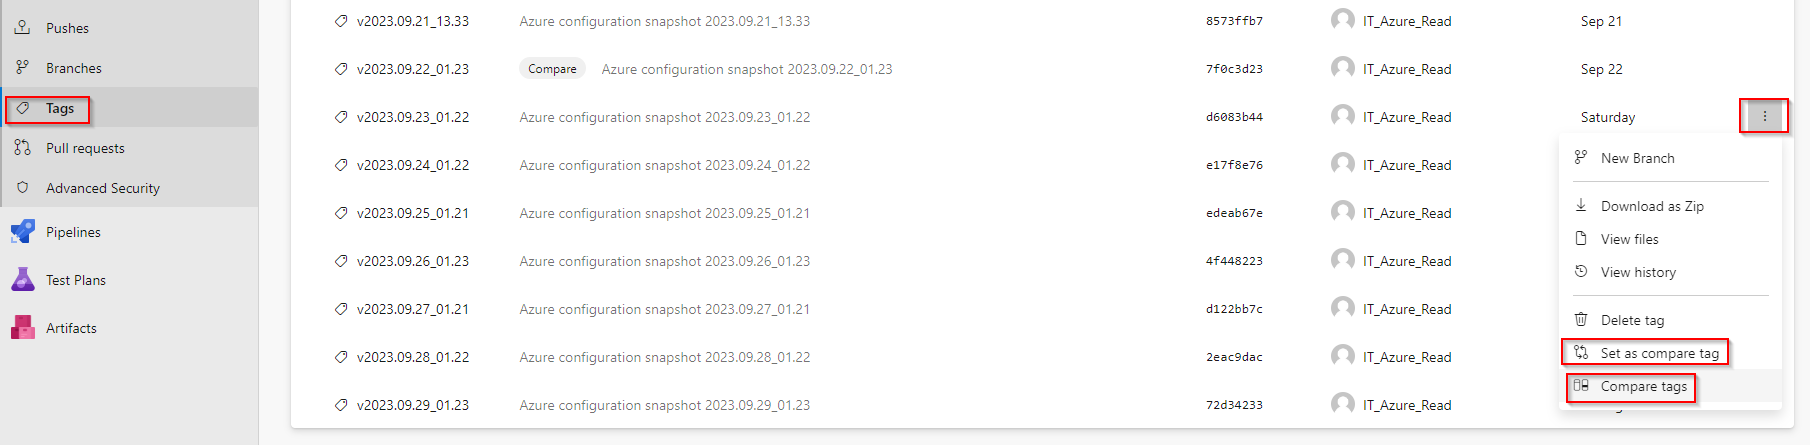
On the result page select Files and enjoy the view 🙂
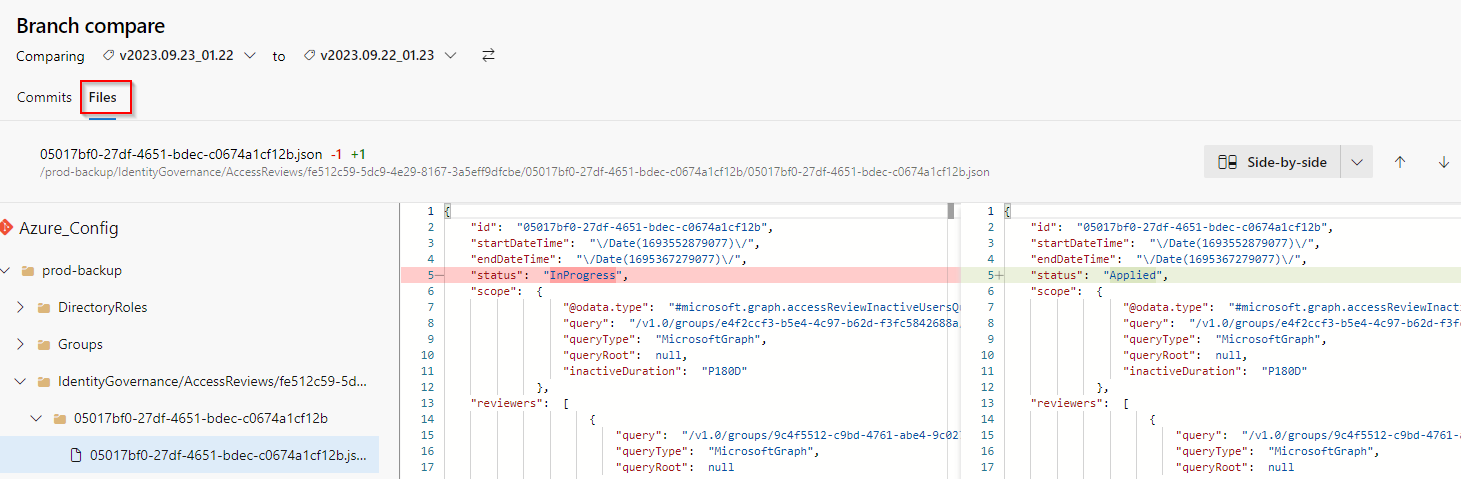
Strikethrough files are settings that were deleted, plus sign on the right side of the file means it is a new setting that was created.
Show the Azure configuration status on a specific date
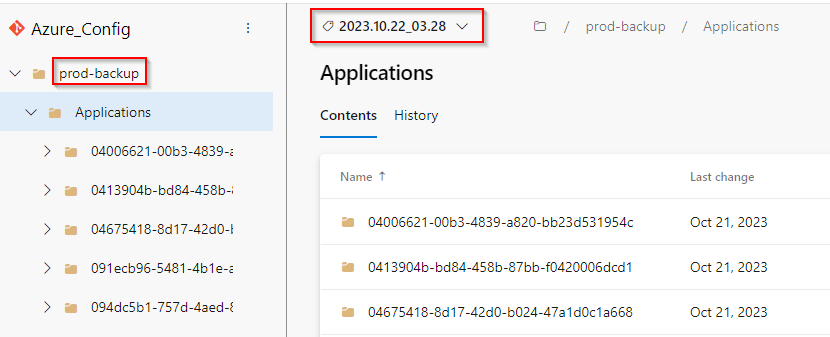
To see what your Azure environment looked like on a specific date in the past. Go to Repos > Tags > Pick the nearest older Tag > Open the folder prod-backup and browse the content (exported JSON configuration files).
This way you will see what your Azure looked like just before the specified date.
To see what changes were made during this time, compare this Tag with the nearest newer Tag.
Beware that if someone made some changes in the configuration and reverted them back before the next backup occurred, they won't be captured (obviously).
Change what should be included in the backup
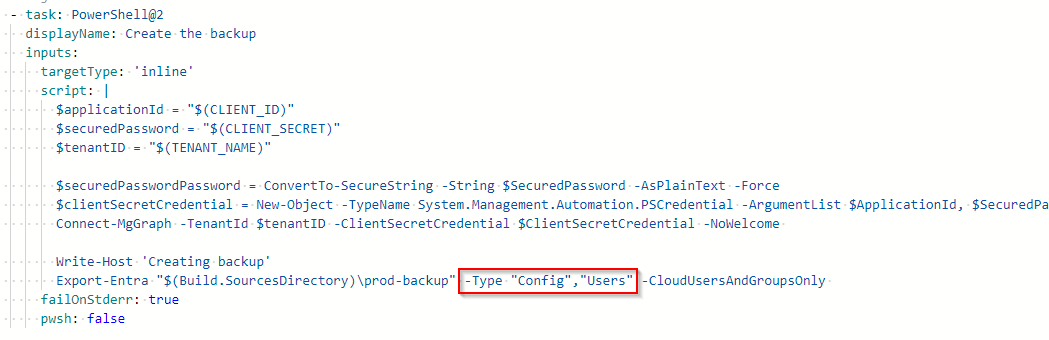
To modify what should be backed up, you must edit Create the backup task section in the Pipeline configuration code.
Go to Pipelines > <yourPipeline> > click Edit > find the line where Export-Entra command is being called and modify its parameters by replacing the -All parameter with -Type and some arguments. What arguments can be used can be found in the official documentation.
So the result can look like this 👇
Restore the backup
Unfortunately, there is no built-in way for backup restore in the EntraExporter tool. Hence in case you need to restore some configuration, you have to do it manually.
How the change author(s) are managed
In the GIT repository, if you want to see who changed file XYZ, you check who was the author of the commit that changed such file. Therefore it was only logical to use the same approach to "save" information about who has changed the Azure configuration (JSON file).
How the change author is found?
When change is detected in the created backup (some JSON configuration file is changed) the pipeline will
Get a list of all changed files
Getting the last configuration backup commit date (
$lastCommitDate)- if no backup commit exists, just the last 24 hours old events of the Azure Audit log will be searched (this limitation is because the first backup can have thousands of files, and thousands of events can be in the Audit log which by my testing leads to exceeding 60 minutes pipeline limit)
For each changed file find out who changed it by
- searching its ID in the Azure Audit log (between dates saved in
$lastCommitDateand start time of this backup run) and making note of all authors that made some changes there
- searching its ID in the Azure Audit log (between dates saved in
Group the changed files by found authors and make a commit for each group where the list of all authors that changed such files is used in the commit name and as the commit author
Put all found authors into the Git Tag description too
Good to know
The list of author(s) doesn't have to be 100% accurate. If you need 100% accuracy (because of security incident etc), use a command
Get-MgAuditLogDirectoryAudit- for example when someone makes a change in the Azure right after the backup starts. Such change can be captured, but the author will not, because the Azure log is searched from the last commit date to the start of the backup task only. If the search ended at the backup finish instead, it could lead to an opposite situation when author list could contain someone who didn't make the change that was captured in the backup.
The list of commit authors shows who has made any changes to committed files (since the last commit). It doesn't show who made what particular change
If a change was made by an application (instead of a user), the name of the application is used as the author name with
(SP)a suffix (for example User Management (SP))If the author of the changed configuration wasn't found in the Audit log,
unknownis used insteadBecause the free pipeline has limited run time, before searching for the change author I make a calculation (function
_enoughTime) whether there is enough time left for committing changes, etc, and if it is not, I skip searching for the author. It is more important to have config backup than risking the whole pipeline to fail- Therefore it is very important to modify the pipeline variable
PIPELINE_TIME_LIMITin case, 60 minutes limit is not applied in your case
- Therefore it is very important to modify the pipeline variable
Summary
If you finished all the required steps, you now have a working backup solution for your Azure configuration which you can easily use for tracking changes & blaming the change authors 😎
Links
About the author
I work as System Administrator for more than 15 years now and I love to make my life easier by automating work & personal stuff via PowerShell (even silly things like food recipes list generation).
Comments
Join the discussionThank you for so quickly fixing the authentication problem. I was troubleshooting and thought I'd check your github to see if you had seen the problem and it was already fixed!
Thats the benefit when the author uses his own creations 😁
Hi, unfortunately, I'm running into a new issue after I've migrated both the Intune- and Entra-Backup from Service Principals to Workload Federating Identities. The Intune-backup works fine, but Entra backup always stops at a certain point:
Removing existing backup directory
04:01 (UTC) Creating Azure config backup Organization/Organization.json Organization/Branding/Localizations.json Organization/CertificateBasedAuthConfiguration.json Directory/OnPremisesSynchronization.json Export-Entra: /home/it/myagent/_work/_temp/eeb6d2b1-b111-46fb-a950-1dca2d9b13d4.ps1:36 Line | 36 | Export-Entra "$root\prod-backup" -CloudUsersAndGroupsOnly | ~~~~~~~~~~~~~ | GET | https://graph.microsoft.com/v1.0/directory/onPremisesSynchronization/redacted HTTP/2.0 403 Forbidden Cache-Control: no-cache Vary: Accept-Encoding Strict-Transport-Security: max-age=31536000 request-id: 4e2a5260-a2d9-4e2c-80c4-c6dfe9bc89cd client-request-id: ff9e6948-885b-4121-8fbe-82290ca98e3c x-ms-ags-diagnostic: {"ServerInfo":{"DataCenter":"Germany West Central","Slice":"E","Ring":"4","ScaleUnit":"004","RoleInstance":"FR2PEPF00000553"}} x-ms-resource-unit: 1 Date: Wed, 23 Oct 2024 02:01:26 GMT Content-Type: application/json Content-Encoding: gzip {"error":{"code":"Authorization_RequestDenied","message":"Insufficient privileges to complete the operation.","innerError":{"date":"2024-10-23T02:01:26","request-id":"4e2a5260-a2d9-4e2c-80c4-c6dfe9bc89cd","client-request-id":"ff9e6948-885b-4121-8fbe-82290ca98e3c"}}}
##[error]PowerShell exited with code '1'.
##[error]PowerShell wrote one or more lines to the standard error stream.
##[error]Export-Entra: /home/it/myagent/_work/_temp/eeb6d2b1-b111-46fb-a950-1dca2d9b13d4.ps1:36 Line | 36 | Export-Entra "$root\prod-backup" -CloudUsersAndGroupsOnly | ~~~~~~~~~~~~~ | GET | https://graph.microsoft.com/v1.0/directory/onPremisesSynchronization/redacted HTTP/2.0 403 Forbidden Cache-Control: no-cache Vary: Accept-Encoding Strict-Transport-Security: max-age=31536000 request-id: 4e2a5260-a2d9-4e2c-80c4-c6dfe9bc89cd client-request-id: ff9e6948-885b-4121-8fbe-82290ca98e3c x-ms-ags-diagnostic: {"ServerInfo":{"DataCenter":"Germany West Central","Slice":"E","Ring":"4","ScaleUnit":"004","RoleInstance":"FR2PEPF00000553"}} x-ms-resource-unit: 1 Date: Wed, 23 Oct 2024 02:01:26 GMT Content-Type: application/json Content-Encoding: gzip {"error":{"code":"Authorization_RequestDenied","message":"Insufficient privileges to complete the operation.","innerError":{"date":"2024-10-23T02:01:26","request-id":"4e2a5260-a2d9-4e2c-80c4-c6dfe9bc89cd","client-request-id":"ff9e6948-885b-4121-8fbe-82290ca98e3c"}}}
The API permissions are exactly the same as the ones previously used for the service principal, which were working fine :-( Looking at a previously successful pipeline-run, I can see that it probably fails trying to collect the Domain-infos at that point, although the app has the Domain.read.all API-permissions.
EDIT: using Graph-explorer, I found that the request for https://graph.microsoft.com/v1.0/directory/onPremisesSynchronization also requires the permission "OnPremDirectorySynchronization.Read.All".
However, after granting that API-permission it still spits out exactly the same error :-/
Can you please help on this error message. If you want I will share the full log details.

https://github.com/ztrhgf/DevOps_Pipelines/blob/main/azure-backup-pipeline.yml
I have replaced the following value mentioned in the above YML file based on our requirement.
SERVICE_CONNECTION_NAME USER_EMAIL USER_NAME
2024-07-22T11:27:30.8857016Z PrivilegedAccess/AzureResources/Resources
2024-07-22T11:27:33.0971646Z ##[error]Export-Entra : GET https://graph.microsoft.com/beta/privilegedAccess/azureResources/resources?$skiptoken=ahw5Jz2nBEKHjChR2YHCiw HTTP/1.1 400 Bad Request Transfer-Encoding: chunked Vary: Accept-Encoding Strict-Transport-Security: max-age=31536000 request-id: 1b1bda25-0619-4098-9dd4-77d26bbe46f2 client-request-id: c6876129-2b01-4bb4-9e1a-dd26165addbf x-ms-ags-diagnostic: {"ServerInfo":{"DataCenter":"North Europe","Slice":"E","Ring":"4","ScaleUnit":"004","RoleInstance":"DB1PEPF0005EB8C"}} Date: Mon, 22 Jul 2024 11:27:32 GMT Content-Encoding: gzip Content-Type: application/json {"error":{"code":"InvalidFilter","message":"The filter is invalid.","innerError":{"date":"2024-07-22T11:27:32","reques t-id":"1b1bda25-0619-4098-9dd4-77d26bbe46f2","client-request-id":"c6876129-2b01-4bb4-9e1a-dd26165addbf"}}} At D:\a_temp\f54b1a51-ab43-4728-afd9-654a06a97a24.ps1:37 char:1
- Export-Entra "$root\prod-backup" -All -CloudUsersAndGroupsOnly
- ~~~~~~~~~~~~~~
- CategoryInfo : NotSpecified: (:) [Write-Error], WriteErrorException
- FullyQualifiedErrorId : Microsoft.PowerShell.Commands.WriteErrorException,Export-Entra 2024-07-22T11:27:33.1407404Z ##[error]PowerShell exited with code '1'. 2024-07-22T11:27:33.1977581Z ##[section]Finishing: Export backup & commit
I am trying to export users using pipeline. Pipeline is running fine but I cant see any files to output folder. And if I export users locally it is running fine.
Hard to say without seeing the pipeline output. Have you granted appropriate graph permissions plus contributor permissions for the pipeline account in your project?
Ondrej Sebela yes I did Have followed your instructions from the article. And I am using clientsecret to connect mgGraph
Mauli then once again, hard to say without seeing your pipeline invocation output :)
Output is saying Users as I am exporting only users but nothing to my exported path
I am not able to attached screenshot so pasting text
Create the backup
NOTE: You can use the -No₩elcome parameter to suppress this message.
Creating backup
Users
Running this I get the an error. Could you please advise on how to best solve this? It works if I run the Export-command locally on a server towards the same Entra ID, but not through Azure Devops using your code. Thanks.
PrivilegedAccess/AzureResources/Resources
##[error]Export-Entra : GET XXXXgraph.microsoft.com/beta/privilegedAccess/azureResources/resources?$skiptoken=XXXXX HTTP/1.1 400 Bad Request Transfer-Encoding: chunked Vary: Accept-Encoding Strict-Transport-Security: max-age=31536000 request-id: XXXX client-request-id: XXXX x-ms-ags-diagnostic: {"ServerInfo":{"DataCenter":"North Europe","Slice":"E","Ring":"4","ScaleUnit":"008","RoleInstance":"XXXX"}} Date: Fri, 05 Apr 2024 07:55:28 GMT Content-Encoding: gzip Content-Type: application/json {"error":{"code":"InvalidFilter","message":"The filter is invalid.","innerError":{"date":"2024-04-05T07:55:29","reques t-id":"XXX","client-request-id":"XXX"}}} At D:\a_temp\32f8a8a7-ae2d-4a87-859d-eafcc7051148.ps1:37 char:1
- Export-Entra "$root\prod-backup" -All -CloudUsersAndGroupsOnly
- ~~~~~~~~~~~~~~
- CategoryInfo : NotSpecified: (:) [Write-Error], WriteErrorException
- FullyQualifiedErrorId : Microsoft.PowerShell.Commands.WriteErrorException,Export-Entra ##[error]PowerShell exited with code '1'.
Are you sure you are using the same EntraExporter version as used in the pipeline? And account with exactly the same permissions? Anyway this seems to be related to the EntraExporter module more of the pipeline code. The problem seems to be in the called uri (filter part). But it's truncated in what you have sent. So hard to say
Ondrej Sebela The code I use in Azure Devops is copied this morning directly from your github, only alteration I have done to it is change the name of the service connection. Rest is identical. I thought first it might be the module, but I got it (the Export-module) working locally on my server towards the same Entra ID so not sure. Do you know how I can un-truncate the error message? The error is equally copied directly, only alteration I made was a few Xs.
Thank you for the great article and also for providing the solution to the community - very much appreciated! :-) Unfortunately, I ran into a problem where the process always keeps timing out on the same commit message: "Creating commit '2024.03.08_12.19 ...." (content redacted ;D) The first few pipeline-runs completed without any problems, but it suddenly stopped working one day and will not continue with a certain commit and just seems to time out at a certain point. The commit message subject is always the same, so it's probably something. related to the processed data, but I'm currently out of ideas what the underlying issue might be, and I'd be very glad to get some tips on how I might debug that!
Had this same problem a few days ago so git repository now contains new fixed pipeline version. Do you use the newest one?
Ondrej Sebela Thank you for pointing this out! I'm definitely using an older version, indeed. Will give it a try immediately! Thx a bunch! :-)
Ondrej Sebela works like a charm - thank you very much! <3
Patrick Tippner thank you for the feedback. I am really glad this solution is useful too 👍
Thank your for the great article. Just a small advise, to keep with current terms, please refrain from using the word "Azure" when you you actually mean Entra (which includes Entra ID). Azure = IaaS/PaaS cloud computing platform and even has its own RBAC outside of Entra ID so using the word Azure instead of Entra is quite confusing.
Hello. Whole pipeline and jobs goes well without errors but I don't see files in Azure Repos like you. In my repos are only YAML file and readme. What I'm doing wrong?
Ok, found the culprit in MS Graph PS SDK 2.11.0: Invoke-MgGraphRequest Broken
Unfortunately this SDK is quite often buggy. I myself came across of several issues in the last too
Thank you for the write up! Do you have a clue why the pipeline keeps skipping users (and groups) while it has all necessary permissions and the correct parameter. Running it manually using an admin account does retrieve groups and accounts.
And if you run it using the application credentials? Seems weird though. If permissions are correct same as Export-Entra parameters...


